Friday, March 24, 2017

Embroidery Snowmen!


It may technically be spring but here in Wyoming we are having a bit of snow so my embroidery snowmen are perfect!

Whimsical!  Whimsical snowmen!  With hearts and birds!  Love it!  All of the embroidered blocks were found on line at emblibrary.com.  Aren't they great?! Once I figured out how many great designs I could find that I loved, I pulled out graph paper and first determined the size of the finished quilt and what part of that would be the inner panel.  I decided upon a 4" grid so the finished embroidery blocks would be 8" and the flannel squares finished at 4".  Then I marked on the graph paper where to put the snowmen and the center heart block and placed the squares around the embroidery.  That was my pattern!  Aren't these guys incredibly cute??  They were stitched on my Bernina 770.


So now the quilting!  This is our new second quilt for the top of our bed during winter; it's designed for warmth and snuggling. So I used up the rest of my bamboo batting using just one layer along with a fun variegated 50 weight Aurifil thread for the quilting.  The first step was to stitch around the snowman blocks and around the larger elements in the blocks as though they were appliqué.  This quilt will be utilitarian and everything laid flat so I broke the rules and did not stitch around all the 4" blocks.  Now!  Let's just pull everything out of the hat that says winter, combine it with simple loops and go with it!

Candy canes!


Ribbon Feathers!


 Mittens!

A winter scarf!!


 Ribbon Candy!

Holly and Berries!


Groups of Stars!

I did something fun in the inner border and went all the way around with words I thought of with winter, snowmen and even Christmas.  Here are a few.  They were not marked; I just went for it.


The outside checkerboard border went back to using a variety of motifs but I stitched a vine and had them come off of the vine.  I just love the warmth and joy this quilt brings!

I hope you enjoyed my Embroidery Snowmen!

Check out some of the links on my sidebar and don't forget Crazy Mom Quilts at http://crazymomquilts.blogspot.com!

Friday, March 10, 2017

Kitty Kat Quilt

KITTY KAT QUILT

This has got to be one of the cutest quilts I have done for a customer and I am not a cat fan!  But it's soooo cute!

This adorable quilt measures approximately 58.5" x 70" and was completed by the same customer who brought me the Purple Curvy Log Cabin quilt.  

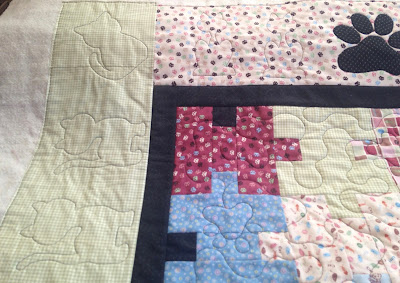
Frances does awesome quilts and makes my job so much easier in that she always has an idea for each quilt she brings me.  This time she wanted paw prints in the center section and cat silhouettes in the open border areas.  No other quilting in the border but to outline the appliqué.  And........she wanted all the quilting in black.  She winced when she made the announcement to me and gave me that quizzical look.  Wow!  Talk about pressure!

So, on to Pinterest again for cat templates.  That was pretty easy.  What took time was getting each one, I used four, to approximately the right size for the border area.  I was shooting for about 5 - 5 1/2" tall.  Next was to remember to use my lightbox and mark the designs on the quilt PRIOR to sandwiching.  Yes!  Got it done!

So here's the paw prints in the center that I mixed in with large meandering, something I don't often do but it looked good in this case.  We ended up using Aurifil 50 weight thread in black in both the top and bobbin.

Instead of a design on the smaller black border, we stitched in the ditch on both sides to keep it simple.

The outside border?  Oh my goodness!  First I stitched around each appliqué and then stitched the stencils.  Here's each corner.  Aren't they cute?


And that's Kitty Kat Quilt, waiting and ready to go home!


Have a super weekend and remember to check out the links on my sidebar for some wonderful quilty spots and don't forget Crazy Mom Quilts at http://crazymomquilts.blogspot.com for Finish It Up Friday!

Tuesday, March 7, 2017

Wool Appliqué with Free Motion Quilting

Wool Appliqué with Free Motion Quilting


I tried something new!  There seems to be very little time to actually sew, so I decided to broaden my horizons and try some projects that would give me something to do with my hands in the evening or while riding in the car.  I really like the look of wool and decided to give wool appliqué a try. 

 It didn't turn out great as I know nothing about threads to use or embellishing techniques.   In fact, I used sewing thread.  It's not bad, just not what would be expected.

The design was appliquéd onto a gorgeous fat-quarter piece of hand-dyed Cherrywood fabric that looks like suede.  I added some stabilizer to the fabric prior to adding the appliqué.  When I realized I was off base with the appliqué, I decided to see if I could salvage it with some free motion quilting.  

So I sandwiched the fabric with two layers of Hobbs 80/20 cotton wool, planned a lovely feather spine, grabbed some So Fine 50 weight thread, and started quilting feathers.  Then I took a 60 weight Mettler embroidery thread and micro-stippled on the inside of the feathers around the appliqué and outside of the feathers by the border.  


 It doesn't fix it completely, but I like it!  I think I'll get a kit next time and try to follow some directions!  Have a super quilty week!