Wednesday, January 31, 2018

The fairy quilts!!!

The quilt I will be sharing in this post is one done by the same lady who did this little fairy quilt!  Its actual title by the artist is Fairies in the Dutch Iris.  It is  approximately 29" square and won first place in the art quilt division as well as the Judges Choice Reserve Best of Show award at the Cheyenne Heritage Quilt Show this past August, 2017.

The quilt I will focus on here is approximately 31" x 34" and I call it Fairy Hidden in the Poppies and Daisies!  This quilt was planned several years ago as a quilted wall hanging birthday gift for the daughter of the Artist.  Although I would have loved to go all out on the quilting, Rose just wanted this to be a nice wall hanging and memory for her daughter.  Do you know how hard it is to reign in your quilting??!!???!!

But I do love this!  Rose wanted to keep it simple so she only wanted to include some small little daisies that spread into the borders and a few butterflies.  She was not concerned that this quilt be heavily quilted.  

I wanted to do some really special butterflies so before sandwiching the quilt, I found a couple of lovely ones on pinterest that had no user protection and printed them out.  The printed designs were placed on my lightbox, followed by the quilt top, and I drew the designs with a blue line marker.  It was perfect!

The top was then sandwiched with Hobbs Tuscany 80/20 cotton wool.  First, each border area was stitched in the ditch.  Then I stitched around every portion of the appliqué, inner and out.  This secured it to the sandwich and gave a nice finish.  Now it was time for the butterflies and daisies.  This was great but I didn't feel like there was enough quilting.  After speaking with Rose, it was decided to add some poppies, making them part of the rest of the grouping.  GREAT!  I had already sandwiched the quilt and I'M NOT AN ARTIST!  So I spent quite a bit of time on pinterest trying to find the easiest rendering of a poppy and a poppy leaf.  It was too late to use the light box! After some practicing, here's what I came up with:

And finally, we left the the flying geese border pretty empty other than just stitching in the ditch around each block.   The outer border added swirls and some designs from the quilt itself.  

Simple and sweet but I think it turned out lovely! 


I can't seem to add videos on my blog but I did put one for doing the poppy on my business Facebook page.  You can find me on Facebook at:

Penny Olive, Free Motion Quilting Educator

Enjoy your quilting and be sure to stop and smell the poppies!


Tuesday, January 23, 2018

Purple with Feathers!

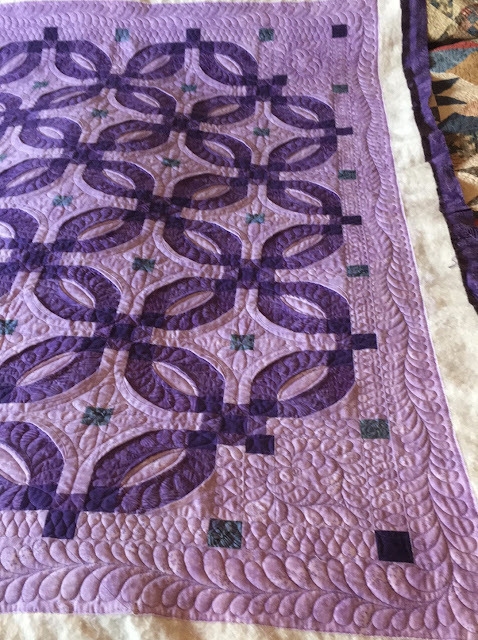
When Cathy brought me this quilt, I started to drool.  Well, not literally, but I imagine my eyes and face showed the enthusiasm within.  I LOVE PURPLE!!!!!  And this is a gorgeous quilt!


There was no doubt that this quilt would lend itself beautifully to feathers.  

The first thing I did was to pull out a dry erase marker and cover a portion of the quilt with my plexiglass.  Since the corner areas are different than the main portion of the quit, I decided to cover the corner and a repeated block.  It just wasn't clicking.  I like the drawing within the block, but not the corner flower nor sashings.  I needed to brainstorm just a bit more.  

I decided to take a photo of the quilt and put the whole photo on the drawing program on my iPad.  I use Procrete with an I-pencil and can blow up portions of the photo to draw in.  This is what I sent Cathy next, with several options for the sashing.  Some of the feathering is a bit wobbly due to using the I-pencil but all I wanted was a quilting plan.

Cathy was thrilled; she chose ribbon candy in the sashing except for the two small pieces by the feathered heart.  She stuck with the little hearts in the sashing there.  

I used my favorite ruler from the Quilted Pineapple to come up with the long curves, and two different threads:  a deep purple Isacord and a lavender Floriani.  Both are tri-lobal polyester threads and are great to bring the desired sheen to the quilt while maintaining strength in the fibers.  We also used 80/20 cotton/wool batting from Hobbs Tuscany Heirloom.  This would give the quilt a little "poof" in the quilting.

First, we stitched in the ditches of the main block areas, the sashing and the borders.  Then, it was time for the fun using the plan Cathy accepted.  Here is a view of parts of the quilting completed.


And finally, a completed Purple with Feathers!!


 This quilt is beautiful; the piecing is fantastic.  Deciding what to quilt in the corner area was the most difficult of the quilting but Cathy loves the hearts.  I love how it turned out!

Have a wonderful week and be sure to check out some of the quilty places on my sidebar!

FIND ME ON FACEBOOK AT:  
Penny Olive, Free Motion Quilting Educator