Tuesday, December 27, 2016

A Passion For Purple

A Passion for Purple!


This past week found me with my favorites:  quilting, purple fabric and free motion feathers!  What a wonderful and challenging time of design!

I've taken the month off from customer quilts to do a little quilting of my own.  One of my plans was a relatively quick whole cloth wallhanging.  What an experience!  The best part was the opportunity to brainstorm and use an array of unusual tools to complete this pretty lavender fat-quarter-size whole cloth quilt. 

First, I knew I wanted the simple scroll design with a feather and I could draw that freehand but I really wanted it encased in an oval.


After looking everywhere, I saw this!  My husband had taken this photo years ago when we were out pheasant hunting.  It hangs in our hallway.  What a great template!


Perfect!!

A pretty scallop or lacy effect would really add to that oval but how could that be accomplished?   After brainstorming again, I remembered the scallops on this Handiquilter 8" ruler/template and decided it would be perfect to create the echoed scallops surrounding the oval.


And this quilters hexagon rotary ruler/template was just right the echoed angles surrounding the oval.


Thread!


The main design and feathers were stitched with Metallic 40 weight thread by Superior Threads in purple with the hearts and pebbles in the echoed areas in green.

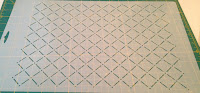
The background area behind the feathered scroll was completed with this 1" on-point stencil grid designed by Gina Perkes.  I had to move it a couple of times to fill the area but it worked great and I used the new 100 weight Microquilter by Superior Threads for that background stitching.


The final outside background I wanted to have blend more into the fabric so I changed to Prescencia 60 weight cotton in a lavender that blended perfectly.


This wall hanging took form step by step.  It really wasn't planned all in advance but rather grew as each step was completed.  I love it and am thrilled with the finish!

I hope you enjoyed the post on  A Passion For Purple!  Have a most blessed New Year and enjoy a wonderful quilty day looking at some at the creativity at the blogs on my sidebar!!

Friday, December 2, 2016

Oriental Paper Piecing

Paper Piecing & Beautiful


This finished customer table topper/wall hanging is absolutely gorgeous and entailed so much work that the quilter decided she was willing to have the project quilted for judging or appraisal should she desire to have that done.  So the quilting entails more work than is often put in to an everyday quilt.

This little quilt finished at approximately 19" square so you can just imagine what the quilter was dealing with.  Now what do I do?????  The first step was choosing batting for the quilt sandwich and I went with two layers:  Hobbs Tuscany 80/20 cotton/wool for the top layer and Hobbs 80/20 cotton/polyester for the bottom layer.  This creates a bit of three dimension effect and allows the quilting to pop.  If you'll look closely you can tell that the quilting began with most every seam stitched in the ditch.  For a project this size, that was critical.  So I began by going down the seams on every angle:  diagonals, vertical and horizontal, and then stitched around each sawtooth star as well as the center square of each star.  This resulted in every seam being stitch but one tiny area in each block that was not a concern.  Now what????

Because of the size of this quilt, a photo did not work well so I layed my trusty plexiglass out on top with a  dry erase marker and began dividing areas.  The original plan was to do some very dense quilting but some beautiful designs started appearing that went well with the design and fabrics of this quilt.  Here's what just the drawing on plexiglass looked like.  

Now, what thread?  When at the International Quilt Festival in Houston in November, I picked up the new 100 weight polyester Microquilter by Superior Threads and decided to use it in the bobbin throughout the quilt as well as for the top thread for the ditch stitching only.  Isacord tri-lobal polyester in 40 weight in white and green was used for the remainder of the top quilting.  Why Isacord?  Why not one of my favorite cottons on a quilt like this?  Well, it was actually a hard thought out decision.  The answer?  Isacord was the only one I could find with a thread that matched the green almost exactly.  With the shiny appearance in the oriental style fabrics, I figured that would be ok.  


Here's the finished quilt.  Once I started quilting it, I realized I needed something in the blocks around the sawtooth stars so we added a few feathers.  The thin green lines following the green in the quilt created a ribbon-type of effect that was very soft and pleasing.  The small outside border was finished with straight lines to bring the quilting to a close.  The way the quilting was done, the stars really pop up off the quilt.


I absolutely love how this quilt finished and enjoyed every step of the detailed process.

That's my finish for the week!  Join me at the links on my side bar as well as Crazy Mom Quilts here: http://crazymomquilts.blogspot.com  and have a wonderful weekend!!!


Saturday, November 19, 2016

Pansies & Fethers!

Pansies & Feathers!!!


The last of a group of six quilts brought to me for completion!  Yay!  This simple customer quilt is so cute and gorgeous with the addition of the appliquéd pansies in the main area and the butterfly in the top right corner.

Two instructions were given:  all over quilting in the middle with pansies and feathers and do what you need to make the appliqués pop and become more interesting, but not too much.  

Once the quilt was sandwiched with Warm and Natural batting supplied by my customer, I began stitching in the center and working toward each appliqué piece to surround each with hidden stitching.  The tiny bit of texture inside the appliqué pieces was added once the entire quilt was completed.


Swirls and leaves were used as the means to accomplish the all over quilting using a white (you got it!) 50 weight cotton Aurifil thread.


The gorgeous batik border was quilted in a soft pastel pink (you got it!) 50 weight cotton Aurfil thread with simple pansy feathers.  


More often than not, I forget to photography the backing.  This one was done in a soft pastel yellow and turned out so pretty that I managed to remember to grab some pictures.


I love how this quilt finished; it is quite stunning in person.  It has a good bit of back tracking but the Aurifil is so nice in that the 50 weight lays lovely and does not create build up. 


If you enjoy free motion quilting or would like to start, leave me a comment if you are interested in design tutorials or simple stitches to start with for future posts.

I hope you enjoyed Pansies and Feathers!  Have a great quilty weekend!


Monday, October 24, 2016

A Finish! - Feathers of Venice

Life has been busy as it is for everyone so I've been slow on the posts but I'm really excited about this one!  Most of my quilting is for customers but I snuck in a fast quilt and was looking forward to the opportunity to fill it with feathers.  I call it:

Feathers of Venice


I am a natural romantic and both the fabric and feathers in this quilt speak romance.  Hence the name.

This quilt was made using the 10 minute quilt block.  There is a book available with different patterns but this entire block is demonstrated on youtube. It truly is sooooo easy and once you get it down, it's very easy to do a quilt in a day.  For this block, you can actually use any size squares.

The fabric was Color Daze by Edyta Sitar of Laundry Basket Quilts by Moda.  I just love her fabrics! For quilting I used Bottom Line by Superior Threads for stitching in the ditch and an Aurifil 50 weight thread in a light beige.  I also used double 50/50 bamboo/cotton batting.  As a side note, I am completely out of batting now and will be looking for a new supplier and also some wool in Houston next week!!  So excited!

My first plan for quilting was to do feathered circle wreaths around each of the brown center squares.  However, when I layed the whole quilt out, I saw nondescript circle areas offset from the four-part blocks.  It appeared it would give the quilt more of a flow than just six wreaths set in block style.  I love the effect.  It also allowed for some cross hatching in the center of each wreath.

I used half-circle templates by Handiquilter for the wreath circles and Quilted Pineapple rulers for the cross hatching.  

For the outside double lace swages, I used a couple of Handiquilter swag rulers.

And for the outside straight lines I used the Handiquilter 8" ruler.  That ruler was also used for stitch in the ditch prior to any quilting.  With that extra stitching the quilt lays nice and flat.

I debated on whether to quilt anything on the brown center blocks because there is a heavy seam right in the center, but decided to do a very simple design that left the center open.


I am so thrilled with this finish and mostly that I get to keep it!  It will also be used as a sample for my feather classes.  

And that's Feathers of Venice!  Hope you enjoyed and picked up some ideas.  Give the 10 minute block a try.  This quilt top, with one layer cake, finished at just under 50" x 70".  What a great throw!


So hook up with me at some of the links on my side bar this week and of course at Crazy Mom Quilts here:  http://crazymomquilts.blogspot.com

As always, have an awesome quilty week!


Friday, September 30, 2016

Kitty in the Window!

Kitty in the Window!

Thanks to the kind comments on Step Out Of The Box!  I worked intensely for over a month on that quilt and I was "dog" tired!  So I decided to chase a cat!  :)  

Seriously, this quilt was brought to me by a customer during the process of the auction quilt.  She said she could wait until the end of September so I told her I would fit it in between Step Out Of The Box and other customer quilts I still need to get done.  It was a magnificent break; love this little quilt (even if I'm not a cat person)!

So Kitty in the Window measures approximately 20" x 26" and is a wedding gift for a friend of the owner.  I used Aurifil 50 weight thread throughout this quilt in a few different colors.  

Here's how I broke it down:  first, stitch in the ditch around the designs and then around the inner section and the outer border.  Next, background quilting in the blue window and a few way lines across the vase for security.

Then some swirls in the top of the cat to give a little texture and straight lines with ruler on the window sill to add depth.

And finally, I LOVE FEATHERS!  So yes, feathers around the top and two sides in a light rose shade and then on the bottom in a light blue.


Absolutely love this little quilt!


So have a great weekend.  Link up with some of the spots on my sidebar and as always, Crazy Mom Quilts here:http://crazymomquilts.blogspot.com


Wednesday, September 21, 2016

Step Out Of The Box!

Auction Quilt now titled:
Step Out Of The Box!


This Friday is the night of the Recover Wyoming fund raiser to help addiction recovery. It's taken more than a month and steady hard work but the quilt for the live auction is complete! I am sooooo excited! This quilt was so named by friend Debbie Bacon; because just as this quilt and the quilting was totally out of my comfort zone, so we all must step out of our own little box to experience freedom from the addictions that may have us trapped.

This quilt was not planned; the material was purchased because I love the fabric by designer, Edyta Sitar of Laundry Basket Quilts, and it was a great time to use it in a local quilt along at Blakeman Vacuum & Sewing where I also teach free motion quilting and host a monthly quilt club.  Prior to this quilt the fabric had sat in my stash pile for over a year.  As you can tell by posts on my personal quilts, my fabric and quilting tastes are more classic and romantic with feathers and flowers and all the pretty stuff. This quilt is anything but and I never anticipated it would be completed almost exclusively with rulers and templates. 

You can read more about the process in my previous post but here are photos of each major section.  Special credit is given to my quilty friend, Debbie Bacon, who gave a whole lot of support, encouragement and design ideas along the way from long distance.  Thank you, Lord, for Facebook Messenger!

The inside of the stars:

Background quilting around the stars from the center medallion area:

The background was quilted in contrast around each star with either a purple, fuchsia, green or electric blue Floriani tri-lobal polyester thread.  Prior to stitching the background OR star, the entire block was stitched in the ditch with Superior Threads Bottom Line thread.

Here is the background in the outside star blocks:

The 2" squares in the Irish Square blocks were done with a template using the pumpkin seed stitch(aka orange peel).  Normally I would eyeball this design but for an auction I decided to be a little more accurate.


The inner border, which was the same background fabric, was the only part of this quilt done with free motion quilting.  The top portion was done using purple thread, which was then echoed with the electric blue thread.  The goal was to tie in the points from the background quilting and then pull the whole border together in the corners.


The outer border was done with the Arc C ruler from Handiquilter following a technique taught by Kimmy Brunner.  The straight lines at the top of each blue thread arc were added to create a texture.  This design was completed with Electric Blue and Fuchsia Floriani thread.  I made a pass around the quilt with the blue thread and then went inside each arc to creat another arc with the fuchsia thread.


This photo was taken at the center of the quilt so you can see how I tied the design together to make it work in the center.


Three sleeves were added to the top of the quilt because it seems this quilt may be used as a wall hanging more than for snuggling with all the design work that was done.  So although I have no idea how the owner may choose to have it hung, I figured adding sleeves might help the bids.

And finally, a label:

Quite honestly, as is often the case, the back of this quilt is almost as lovely as the front!

I am excited to see the amount of the high bid for this quilt.  I definitely stepped outside of my box but it is sooooo fun to push and refine all kinds of techniques.  Hope you step out of YOUR box this week!!

Join me over at one of the sites on my side bar and don't forget Crazy Mom Quilts here:  http://crazymomquilts.blogspot.com


Thursday, September 1, 2016

Auction Quilt Finish

I love this quilt!  I am usually more classic and this stretches me beyond limits but I love the fabric by Edyta Sitar and got a super deal on Craftsy so it was a good time to try it.  It worked great in the Breezy Batiks pattern used for a quilt along at the quilt club I host at our local vacuum and sewing dealer in town.

Little did I know my husband would ask me to do something as a fundraiser for Recover Wyoming (he sits on the Board), a program that assists recovering addicts of all types transition into society as functioning citizens as well as help them stay in recovery.  They will be having their annual fundraiser September 23rd and this quilt was perfect.  It is complete; all I have to do is quilt it.

So I've been doing a chronicle of the quilting process on my Facebook page starting with the sandwiching:


to thread and designs.


I've done the orange peel stitch with this lavender Floriani thread in the 2" squares and am ready to start the star blocks with this compass design:


using these rulers/templates:

I've actually already completed several of the stars and background but haven't gotten to that point on Facebook yet.  I am just getting to the point of talking about the thread choice or choices.  So that will be a good post for next week!  Or you can look me up on Facebook using my name:  Penny Olive.   

Have a great Labor Day weekend!  Check out the quilty spots on my side bar and don't forget Crazy Mom Quilts (if she's back from her break) at:  http://crazymomquilts.blogspot.com