Friday, April 29, 2016

Chocolate!

Chocolate!

I love chocolate!  She is gorgeous!  Chocolate measures approximately 45.5" x 55" and was quilted with a cream colored Aurifil 50 weight thread in the center area  and a red Aurifil thread in the border area.  

Chocolate was actually made from a very simple pattern I created several years ago.  I had found some quilt quality fabric in yardage and a charm pack at an estate sale.  Not knowing what to do with it, I made my first pattern design.  Here is the original quilt:

My girlfriend, Kelly, saw this quilt and wanted to make one.  So she had me write up a pattern.  She had a charm pack from Three Sisters called Chocolate, and the rest is history.

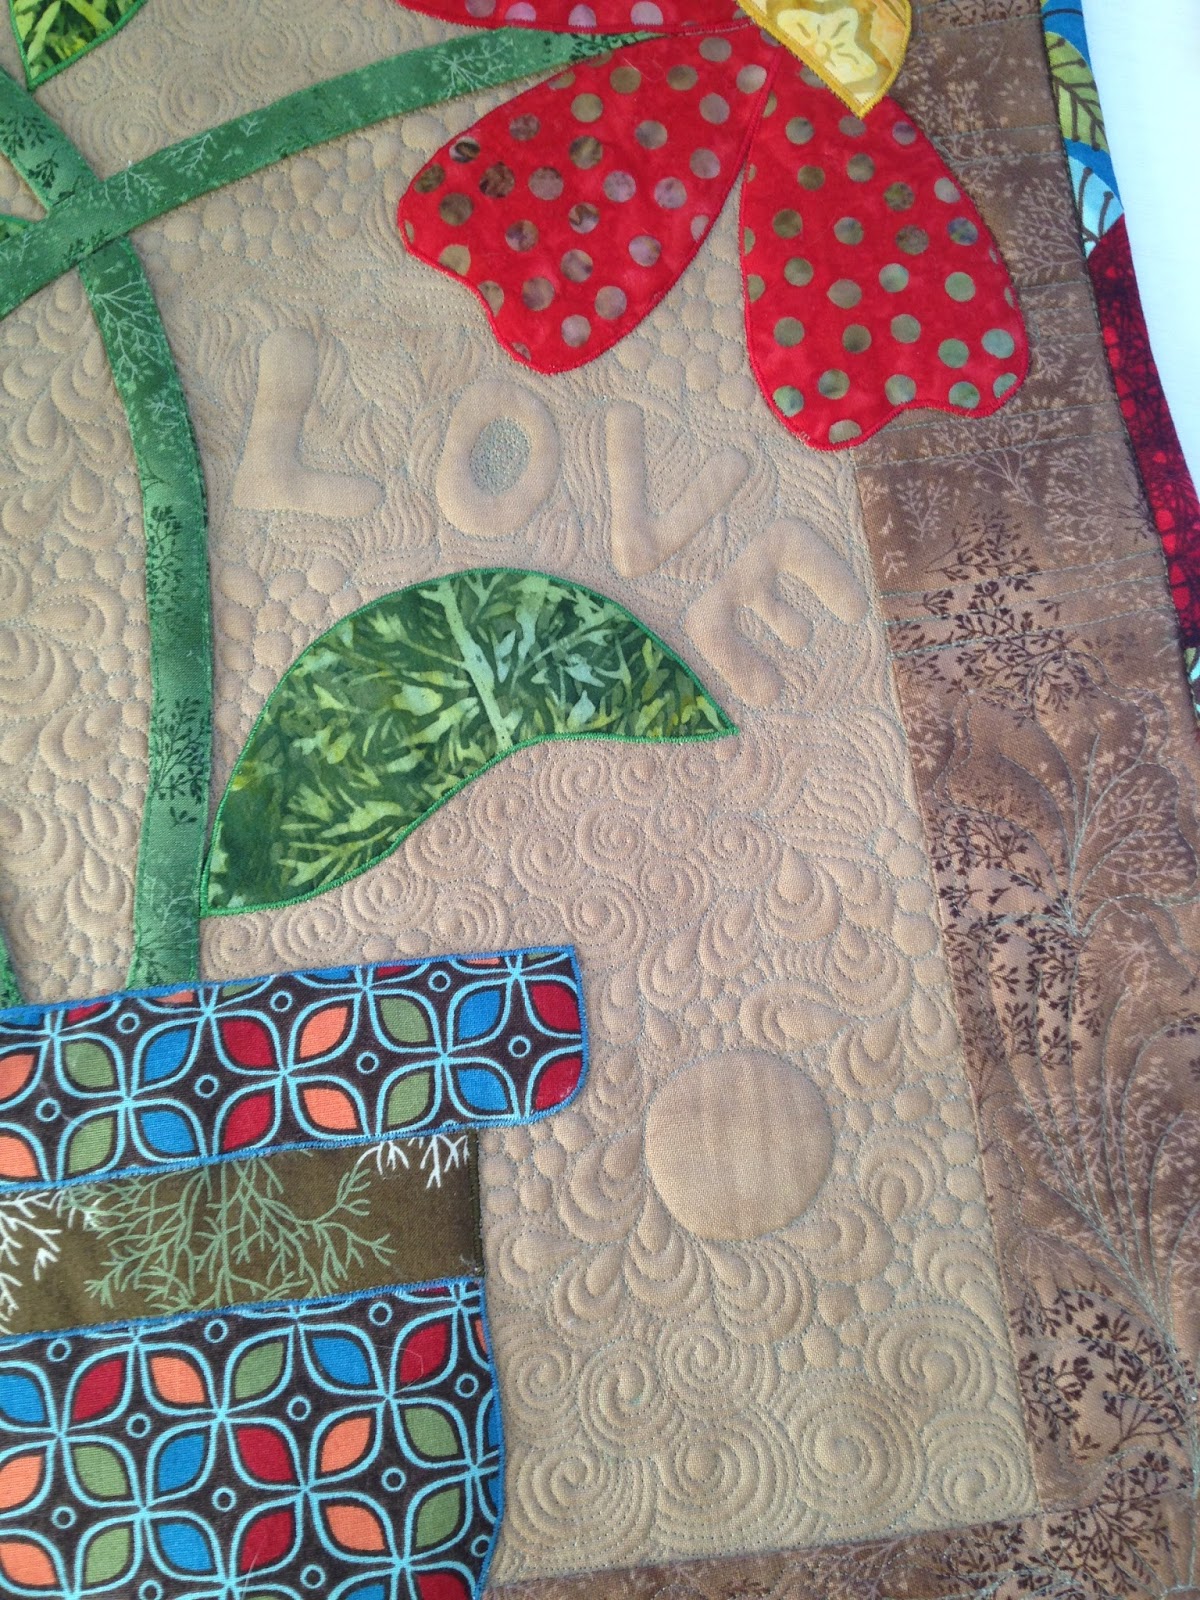
I quilted Chocolate for Kelly following a class I completed by Bethanne Nemesh on Iquilt called "If You can Feather, you can Freehand."  The techniques learned in the class were used to complete Chocolate.  Although it's hard to see, the quilting turned out great.  Included in the quilting were daisies, leaves, a trio of feathers, butterflies and dragonflies.  Here are some closeups.


I would definitely recommend this class.  The idea is mid-custom quilting but it is quite simple, especially if you already free motion quilt feathers.

Well, as always, join me for some linky parties with the buttons on my sidebar and definitely do not forget Finish Up Friday here:  http://crazymomquilts.blogspot.com  Have a great weekend!

Friday, April 22, 2016

Valentine Heart Table Runner!

Valentine Heart Table Runner!


Yes, you read right!  I was asked to quilt this 21" x 52" table runner just prior to Valentine's Day but could not fit it in.  So it came up on my list this week.  

This is a gorgeous table runner and it provided me an opportunity to put some thoughts I've had over the past couple of months into practice.  My quandry:  How can I provide some sort of custom quilting to customers without it becoming a significant expense for small quilts like table runners and wall hangings so I don't have to resort to the common all over quilting.  

This education experience began by taking a photo of the quilt top and printing it on 8 1/2" x 11" paper.


Then I took some tracing paper, covered the photo and began doodling.  To me it felt this table runner screamed for  romantic feathers to accompany the sweetheart feeling for which the runner was created.  Not to mention, I LOVE feathers.  They come naturally.  So now I had this:

I could see how things were coming together and really liked it so I started quilting.  However, when I finished the background, it had already been two hours and I wasn't comfortable doing the hearts the original plan.  You can see what I had planned in the top two left upside down hearts.  Part of the fabric was dark and part was light so I wasn't sure one thread would work in both.  Now what?

The solution?  I think it's what I've been looking for.  Go to town on the custom quilting that looks stunning but back off when quilting is not needed.  What does that mean?  Well, I ended up stitching in the ditch around the perimeter of each heart and on the two opposing sides of the nine patch.  

The stitch in the ditch took about an hour for all ten hearts.  I had thought about doing a little something in the darker side of the top of the heart and proceeding with my plan to do the seed stitch in the nine patch, but it didn't need it.  Sometimes I think we quilt just to quilt and get everything filled.  I decided that the hearts needed to stand out and the stitch in the ditch accomplished just that.  The largest area that was not quilted was the nine patch, which was 4 1/2", totally within standards for most batting.  

I think it's beautiful.  Here are some more photos:


Doesn't the heart look lovely as a stand alone with no quilting?   I think the runner now accomplishes the purpose for which it was created, to celebrate the season of Love rather than someone's quilting.  

So what do you think about quilting?  More or less?

As an added FYI, my post was late today because I have been busy loading this:

for a weekend trial run, which replaced this:

which was stolen late one Monday night in January. 

It's been so cold we haven't been able to get out but today and this weekend it's supposed to be in the 70s!  AND, I'll be down in Boulder, Colorado tomorrow (Saturday) teaching a basic Free Motion Quilting Class at the new Blakeman Vacuum & Sewing there in Boulder.  If you are from the area, stop in and say hi!

As always, join me at Finish Up Friday here: http://crazymomquilts.blogspot.com and at any of the link ups on my side bar.  And have an awesome weekend!

Friday, April 15, 2016

Flannel With Feathers

Linda's Flannel with Feathers!


Another beautiful quilt by Linda!   And just in time:  we are under a winter storm watch with 6"-12" of the white stuff expected!  Yes, this is April 15th!  We were in the 70s yesterday!

Flannel with feathers measures approximately 47.5" x 77".  It was quilted with Aurifil 50 weight thread in a variegated black.  That was a bold choice but it turned out gorgeous.  The black is mixed with a bit of gray and white.  It was quilted with a type of nemesh feathering but I changed it up just a bit.


The back is a very light gray so the quilting stood out in bold fashion!


Linda was very happy with the final results and looks forward to snuggling up in it this weekend.

As a side note, I'm looking forward to doing a Fantastic Feathers class tomorrow over at 
Blakeman Vacuum & Sewing---if it isn't canceled due to the "white stuff".  I'm even more excited this time as I will be implementing my new document camera by IPEVO for drawing designs instead of the old fashioned white board on an easel that keeps falling down.  Yay!  So we've gone from this:


to this:!

AND......Blakeman's has opened a third store, this one in Boulder, Colorado.  I will be teaching a basic class there next Saturday and then another in May.  

Soooooo.....I've been warming up my fingers to do some drawing and demonstrating.  In truth, I was just having fun!  Don't you love playing with designs?


And finally, the quilt club I host met over at Blakeman's recently and some of the show and tell projects were fantastic!  Daenette showed this foot pad she made for a sewing machine from shelving  plastic and 1 1/2 jelly roll strips.  I WILL be making one of these!


Joy did her cat quilt as an "in the hoop" project:
What a fantasti quilt!

And Mary Ellen's table runner was cute as a button:

Well, that's my quilty life!  Come join me at Finish it up Friday here:  http://crazymomquilts.blogspot.com or pick a button from my side bar and enjoy the quilty fun.   Have a super weekend!

Friday, April 8, 2016

Flowers for Me!

FLOWERS FOR ME!


I am Soooooooo excited to have a wall hanging for ME  And, with my favorite design:  flowers!  It all started when I quilted The Dragonfly Quilt for Linda.  You can find the post here:  http://pennyquilt.blogspot.com/2016/03/the-dragonfly-quilt.html.  I wanted to do some custom quilting with double batting for me, but I don't have a project ready and I didn't want something big.  Then I saw this post:  http://www.quiltkisses.blogspot.com/2016/03/flower-pot-mini-finish.html by Jasmine at Quilt Kisses and it was sooooo cute.  I knew the panel was not available any more so I decided to just make my own flower wall hanging.  Some research on the internet produced this blog: https://ankastreasures.files.wordpress.com/2009/06/charmed-free-pattern-for-blog2.pdf,  from which I developed Flowers For Me, a scrap appliqué wall hanging.  I used 2 1/2" jelly roll strips for the basket, flowers and leaves, which I received in a swap at the March quilt club meeting over at Blakeman Vacuum & Sewing.  


The real fun came with the quilting.  Flowers for Me measures approximately 20" x 24" and was sandwiched with two layers of 50/50 cotton/bamboo purchased from Winline.  Eventually I will purchase some wool and use it in the top layer but I haven't had the opportunity to do that so for the time being, cotton/bamboo will suffice.  Using Bottom Line by Superior Threads in both the top and bottom again (light olive green in top and cream in bottom), I first outlined each appliqué piece and stitched in the ditch between the main section and the border.  Then with a white Sewline pencil I wrote in and then stitched some whimsical words and a couple of circles.  Then came the quilting.  Yay!  I had so much fun.  I just love this style of quilting.  Here are some close ups:


The border was narrow, about 3" wide, so I stuck with something simple and did a flower in each corner, attached to some pansy flowers like I put in The Dragonfly Quilt.  It turned out very quaint.


I love my new wall hanging!  Hosting Quilt Club helps me make things I wouldn't ordinarily set aside time to do.  I'm thankful for that.  So join me at Finish it up Friday with Crazy Mom Quilts here:  http://crazymomquilts.blogspot.com and some of the links on my side bar for a great quilty weekend!

Friday, April 1, 2016

Winter Window Quilt

Winter Window Quilt


Winter Window Quilt is another quilt brought to me by my customer Linda, for whom I quilted The Dragonfly Quilt which I posted last week.  Linda created this small 40" wide by 31" in length quilt for her daughter as a winter quilt for her kitchen window.  I had a lot of fun with this cute, cute quilt; it certainly got done faster than The Dragonfly Quilt!

Since a lot of the quilting would be done by blocks, the first thing to do was to stitch in the ditch everywhere except the individual braids on each side  and below the trees.  That goes a long way to making blocks lay flat.  All but the snowflakes in the background blocks were quilted with Isacord on the top and Bottom Line off white in the bobbin.  The snowflakes were quilted with Yenmet thread in the top, which is an off white, but it has some iridescence to it and sparkles in the light.  The quilting was kept more simple to fit the design and planned use of the quilt.

The center block was done with a single cross hatch so I didn't "cloud up" the bunny.  Then the trees were quilted just in the dark green tree area with a "circle eight" or "wishbone" design.  The rest of the tree area was left simple with stitch in the ditch.


Each of the four individual blocks were quilted like the block below.  I used four different snowflake patterns throughout the quilt.  The one in the top left of this block was done free hand but the remaining three were done by creating stencils.  I moved the positioning of the snowflakes around in each block.


Next came the braids to the left and right of the blocks and below each tree.  These were quilted with swirls and holly leaves leaves a la Bethanne Nemesh.  What a fun way to quilt with beautiful results.


The outer border was only about 2" wide so we finally decided on a simple wavy serpentine with holly leaves and berries but used a light green thread to bring out the color of the quilting a little more.  It turned out great!


The backing is soooo cute and colorful.....


When I was stitching the snowflakes, I was concerned whether the quilting would even show.  So I took the quilt to my kitchen window and hung it up.  It was a cloudy day so there was no sun shine but just the daylight created a magnificent effect with those little Christmas trees.  In person they look more like the old florescent Christmas lights.


Winter Window Quilt turned out beautiful!   I have one more quilt on tap to complete for Linda and am looking forward to a little all-over design on the next one.  Thank you so much for all the support and encouragement on The Dragonfly Quilt post last week.  I was thrilled!  

Have a fantastic weekend and join me as I link up with Finish it up Friday here:  http://crazymomquilts.blogspot.com as well as the links on my sidebar.