Sunday, March 29, 2015

Pronghorn Antelope Quilt Finish

I finally finished the binding on Mr. Pronghorn.  I usually do my bindings by hand but for some reason, I had a hard time getting motivated to finish this one.  But now it's done, washed and in the possession of my husband, who is thrilled with it.  Lots of photos follow:

Pronghorn Antelope Quilt


The sunrise/sunset(?) is quilted with red, orange and yellow angled lines, imitating the sun rays (reflection)


The antelope itself is done more as a modified art quilt with lines that apply texture and move with the flow of the fur.


The quilting around the antelopes(s) changes with the environment.  The ground is done with pebbles, the sagebrush with swirls and the grass with what I call "fire".  I worked around the rocks, using more texture to quilt them based on their shading.


The  four corner blocks in the star blocks around the perimeter of the quilt are quilted with "rays", mimicking the rays in the sunrise/sunset.  The orange points of the stars are quilted 1/4" in on each side of the triangle.  The center of the block is done using an eight sided figure.  I love these because the sides of a block provide an entourage of ideas to be used for quilting.  The brown triangles between the orange points are done with a simple swiggle.  I love these blocks; they have personality.    I quilted the green between each star with straight lines 1/4" apart.  These were done with a ruler.  The green border around the quilt is also done with straight lines 1/4" apart but I chose not to use a ruler but the width of the hopping foot.  It came out a little wobbly but looked somewhat natural.


Finally, the brown wood grain border of the panel was quilted as a modern wood grain.  I don't know why but I really like doing wood grain.


And that is Mr. Pronghorn, gifted to my husband who has wanted his own quilt for some time.  He is excited.  

The main thing I learned from this quilt is that simple is good.  Ha ha!  It took a lot of work but I am actually very happy with the end product.


Have a most blessed week!


Thursday, March 26, 2015

My Remodeled Sewing Room!!!!!

Yes!  It's done!  Well, mostly.  I could do a little staining but that is one thing I will put off for a little while.  Actually, I need to get some contract quilts done AND  I'm afraid.  Yes afraid!  Staining has never been my thing and I don't want to ruin the look.  I'll get there eventually but first I will put it off.   (smile, smile)

What on earth am I talking about? Well, we have lived in our current home for about 12 years.  For the first year or two I did not have room to pull out my sewing machine.  For the next couple of years I had a corner nook.  For the past several years I have shared a room with my husband and son.  They had the computer side and I had the sewing side.  With the purchase of laptops, their space became smaller and not used very often.  I finally asked my hubby the big question:  "Can I?"  You ask, can I what?....Can I take over the room with my quilting.  Since by then all that was left was a book case and printer, Hubby fully supported my takeover.  In fact, he encouraged it.  The only agreement was that the printer had to stay in the room to connect with the lap tops.  No problem!  I can handle that.

Now that room has NEVER been painted since we have lived in the house and it definitely needed it. So when my husband agreed to having me use the entire room, he knew I would need to remodel.  And THAT is what I have just finished!!!!!  Yes!!!!  I have my own sewing room.  In fact, can it classify as a studio?  I have my very own studio.  Better be careful.  Pride cometh before the fall.  But I love it.  It is awesome and I know I am VERY blessed.  Blessed with life, blessed with health, blessed with a wonderful family and blessed with a wonderful husband.

So come take a tour of my new sewing area.  To begin with, this is a small 10' x 10' room so I had to maximize my space.  It really didn't change that much, just some space saving plans.

This is the view from the doorway:


If we turn to the left, this was the previous view:

This is the replacement:
The walls have been painted a soft yellow.  I had one of the cabinets but purchased two more (those are the ones I need to stain).  One 25" x 72" piece of particle board (1/2" thick) was covered with batting and fabric to become my ironing / cutting area.  Above it I mounted two 8" x 36" shelving units for my "knick knacks".  I love it!

Here is a closer photo of the ironing / cutting area:


And..... a covered cork board on the side!  Awesome!  I may decorate it later with ribbons and such.


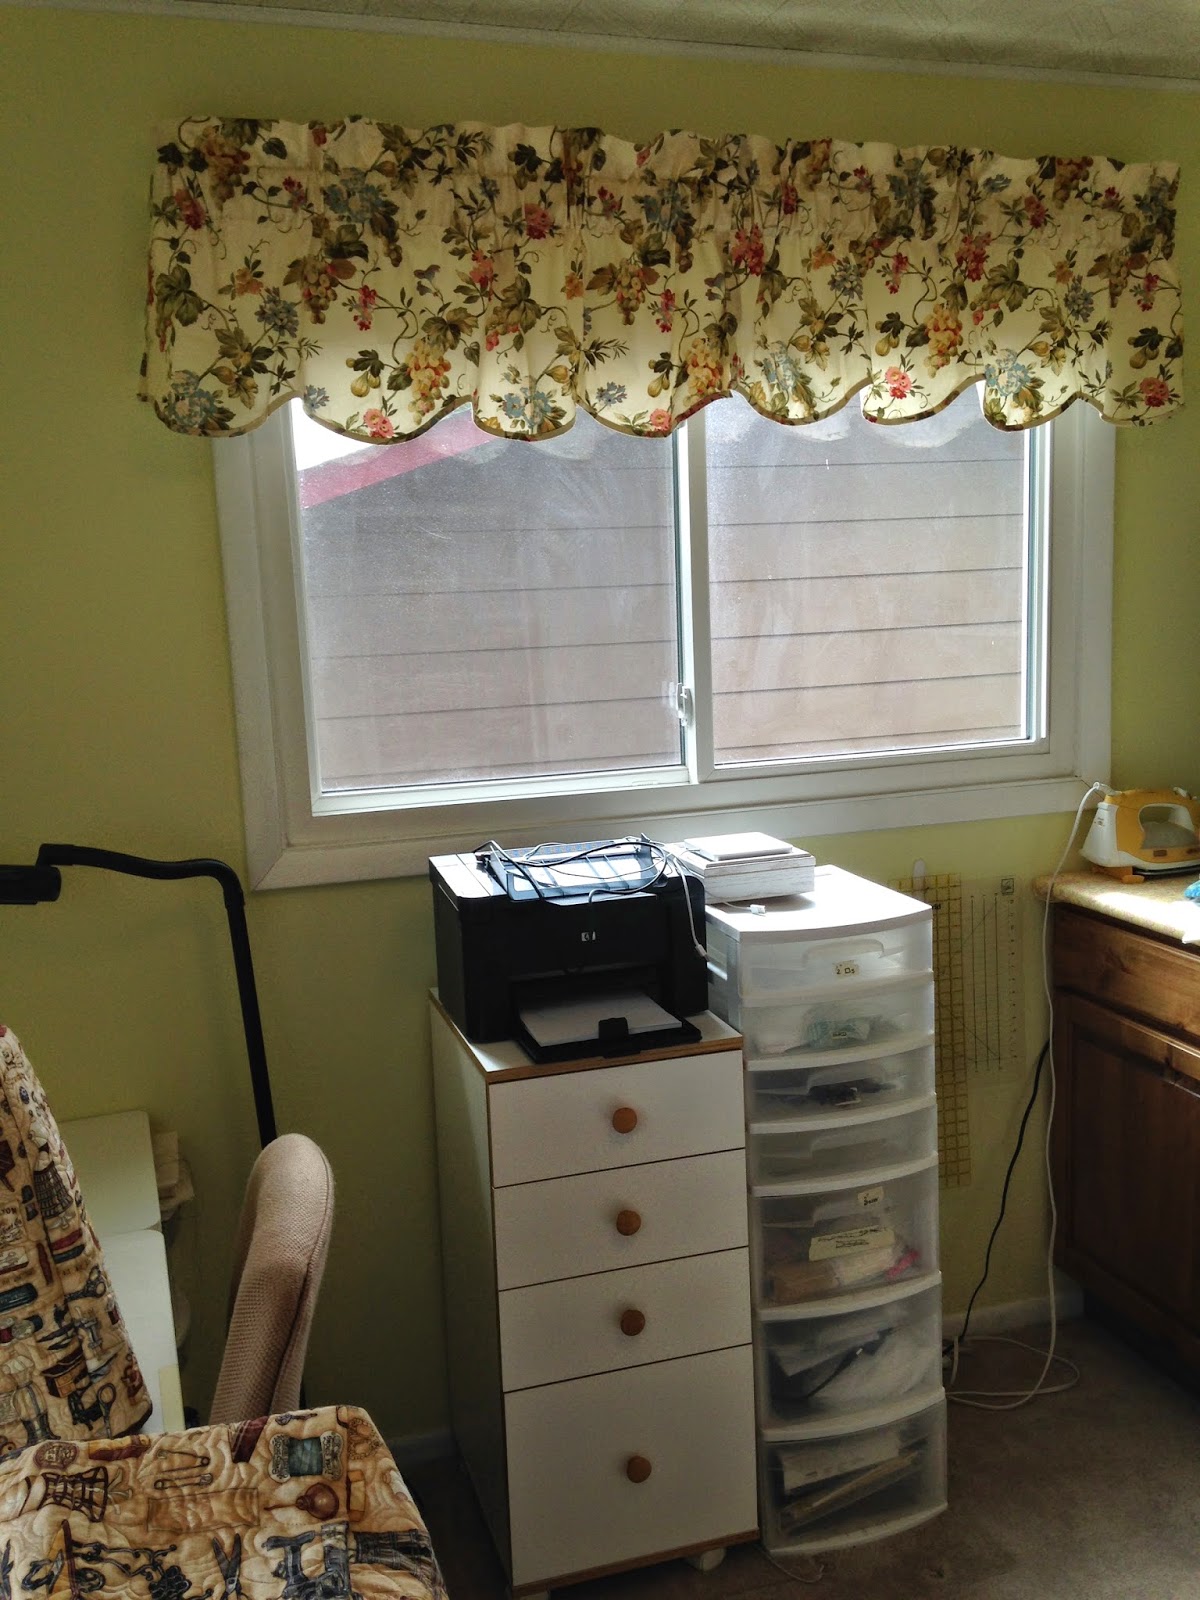
Moving to our left again, is a beautiful picture window with new blinds and valances.  In front is my Horn cabinet (notice that printer) and my scrap storage (which will hold my computer on top).


To the left again is the same wall we view from the entrance way.  I could not do much about this wall.  I have to have my Sweet 16 and it works to have Nina beside it on which to lay quilts.  So this area pretty much stayed put other than I moved the horn four drawer unit out for the printer.


To the left again is my stash and closet:

The closet houses clothing fabric and scrap book supplies.  My husband found a closed cabinet he plans to surprise me with for my stash.  That will be more attractive than things hanging out.  I really need to go on a fabric fast.  But the neat thing about the closet is the curtain rod above.  

Ta da, instant design board.  Yet simple to remove.  
I used the curtain hanger with clips so it is easy to remove.  NEVER had a design board before.  I always use the floor and take photos so I remember how to put the quilt together. I am REALLY looking forward to using a design board.

That brings us full circle!  My new "quilt studio"  My favorite part is the addition of the cabinet unit with the ironing/cutting board.  And even my husband said it seems so much roomier.  What is most surprising is that it took not quite four days.  I thought it would be at least a week.  

Now what?  Time to clean my house!  Have a great afternoon!


Tuesday, March 24, 2015

Casper Free Motion Quilting Class

What a weekend!  Saturday was FANTASTIC!  This was the day of my first free motion quilting basic class at Blakeman Vacuum and Sewing in Casper.  Class started at 10:00 and lasted until 4:00 so we left the house at  6am.  I had twelve awesome students and our time was absolutely fantastic.  Everyone progressed and we had an absolute blast.  One lady even drove two hours away from Riverton!  I was also able to meet the new store educator, Nancy.

After a full day of teaching, we headed home and arrived back at our humble abode about 8pm.  I was so thankful my husband chose to go with me.  No, he didn't stay at the store, he spent some wonderful out of doors time with friends.

 I will be going up for another basic class in June and either an advanced or feather's class in July.  We plan to let the students decide which they would like first.


The classroom was huge!  We made use of the white board, videos and even live instruction on the Tiara!  My husband is astounded at my increased knowledge of technology.


The ladies were VERY focused.


But we had fun too!  Success!


No, I don't have leprosy, I was in the middle of showing the importance of knowing the right and wrong side of needle punched batting.

I sooooo thoroughly enjoy teaching and Saturday was no exception.  Thanks to Blakeman Vacuum and Sewing for having me.  They were great!

My next post will be on my newly updated studio!!!!  Almost done.


Wednesday, March 18, 2015

My Mondo Bag

I never dreamed I would be posting before next week but I had such an awesome time with my quilting friend, Kelly, today that I just had to make a post.  We spent all morning working on our Mondo Bags(pattern by Quiltsmart).  The outer bag uses a preprinted fusible interfacing on which you attach 2 1/2" squares.  Unless you choose differently, the lining uses 1 1/4 yards of fabric fused to batting.   There are 12 major steps and we only made it through the first four so we will be getting together at least one more time to complete the bag.  I had a wonderful time sewing on my new Bernina 350PE.  It is sweet!


I used a Floribunda jelly roll by Benartex to make four of these rectangles which will form the outer Mondo bag.  The back tan fabric is what I planned to use for my lining but I may still change my mind on that.  The two strips in the front are what I plan to use for my handles.  My friend will be gone for a week but I hope we can get together  soon after her return to complete our bag.  It is great for carrying quilts for show and tell.  

I hope to spend next week working on a complete remodeling of my sewing room!  I hope I can get it done in one week.  My remodel will include new cabinets, a new paint job, new blinds and some moving around.  I can't wait!  I have four quilts tops waiting for quilting so I need to get with it!

Have an awesome Wednesday!


Tuesday, March 17, 2015

My new Bernina 350PE!

One of the benefits of teaching, which I so DEARLY love, is being able to reinvest into my business/craft without dipping into our family budget.

It was very hard to part with the sewing machine on which I learned to quilt and which was put through much hardship as I quilted between 30-50 quilts on it when I first began free motion quilting.

That includes this king size quilt for which I won a blue and purple ribbon at the local county fair.

Wow, that seems like ages ago but was only about eight years in the past.  Time flies when you are enjoying what you love to do!

That Janome still works great but my desire for perfection (ha!) made me look for a potential replacement.  Upon purchasing my Bernina 750QE, my wonderful companion took the back seat a second time and became a class and retreat sewing machine.  The first time was when she retired from free motion quilting when my husband bought me my Handiquilter Sweet 16.  As a class machine,  she was easier to transport than Nina.  However, I found I could not get the 1/4" seam allowances to match.  So I withdrew from working on a project that I could not start and complete in the same setting.  

I believe my new friend will alleviate this problem as I can use some of the same feet on both (including the 1/4" foot).  I haven't named her yet, and probably won't, as I will probably forget her name between uses!!  But she is delightful and sweet!  Meet my new Bernina 350PE (patchwork edition)

She is awesome!  I still have lots of stitch selections and memory but she is a little more stream-lined.    The walking foot that comes with her is WOW!  Best of all is the fact that many of the feet I use on Nina are interchangeable with my 350PE.  I spent a couple of hours yesterday over at Blakeman Vacuum and Sewing with Chris Blakeman getting her all set up.  He made sure everything was up to his and Bernina standards.  

I can't wait to hopefully take her to a get-together on Friday down at Blakeman Vacuum and Sewing. We will be sewing quilt tops for what is called the Final Salute:  quilts for veterans upon their decease which will be given to their family members.  What an awesome community service!  Then I have a midnight sewfest next Friday evening (the 27th) with my super duper quilting friend.  We start about 6pm and go into and beyond midnight.  Needless to say, hubby and son go to bed without me and my Saturday is slow.  I can't wait for that evening!

I won't be using my new friend this weekend, though, as I will be traveling to Casper, Wyoming to conduct a one day basic free motion quilting class at the new Blakeman Vacuum & Sewing that has opened there.  The class has been full for several weeks; I will have twelve students! To say I am excited is an understatement.  My normal class is a four-part series so I have had to tweak this class to fit within one day.  So excited!

I am still trying to finish the binding on my antelope.  I will almost for sure complete it this weekend as I can work on that while my husband takes the wheel when we head to Casper.  So I probably won't be posting until next week.  

Be filled with the Spirit of God as you face the remainder of this week and remember that He is providential.  In fact, I was reading today in Ecclesiastes 7:14
In the day of prosperity be joyful,
But in the day of adversity consider:
Surely God has appointed the one as well as the other,
So that man can find out nothing that will come after him.

Know that God is in control of each of our lives and uses all things to build character in us and dependence upon Him.  

God bless you!


Wednesday, March 11, 2015

Falling Leaves

Falling leaves is complete and is already back in the hands of the owner.  I had a great time quilting this quilt.  The formal name from the pattern is "Windswept"by Patchwork Studios. I was right on target with the title because the fabric is called Falling Leaves by Northcott.

Photos never do justice  but here is the completed quilt hanging:

The quilt is so big it is hard to see the quilting so I have included some close up shots:

Here is the center panel done with swirls in the background.  In order to blend colors with the background I actually switched from dark orange, to light orange to yellow as needed.  All the appliquéd leaves were highlighted with vines as well.  


I followed parts of the quilting from the pattern and did some straight lines as well using my Handiquilter rulers.


And finally, the borders using more straight line quilting, leaves and "s" curves.


I am very pleased with the results and the owner is thrilled.

Tomorrow I will be teaching a Bernina computer interface and BSR (Bernina Stitch Regulator) class over at Blakeman Vacuum and Sewing and Friday is Quilt Club!  

May God bless you richly and lead you in all wisdom and understanding to proclaim His name and accomplish His purpose.  


Thursday, March 5, 2015

Falling Leaves

I spent most of the day working on Falling Leaves.  I think the hardest and slowest part is done.

The best part of my day, though, was spent attending the funeral of the mother of a very precious quilting friend.  The service time was spent remembering that Christ is our life and the eternal life we have with Him if we surrender all that we are to Him while here on earth.  It was just extremely encouraging and uplifting and was God's way of reminding me that though the world forsake me, He never will.

I hope you enjoy Falling Leaves.  Hopefully, more tomorrow.

Wednesday, March 4, 2015

Yay!  The quilting on the antelope quilt for my hubby is complete.  It is just waiting for the binding to be finished.  Then a quick washing and ready to post.  In the meantime, I have sandwiched the quilt I previously posted that I am doing for a customer.  I am calling it falling leaves.  It is gorgeous and is 72" x 72"   It will be used as a wall hanging for her bedroom.

So for sandwiching, I lay the quilt top down on the batting and cut it the appropriate length.  This batting is 50/50 bamboo-cotton.  I then open the batting and lay the quilt on it and cut about three inches from the quilt all the way around.  I don't find that a lot of extra batting or backing is necessary when free motion quilting as it does not tend to shrink much.  I have done a king size quilt in the past with about 1/2" on two sides and it worked fine.  The extra is more for handling than anything.  After I have the batting cut out, I lay the backing on my carpet with the right side of the fabric facing the carpet.  I tape one side with masking tape, bring it taught and then tape the other side.  I then tape the top and bottom, keeping the entire backing taught (not stretched, just taught).  Yes, I do use painter's tape and have been doing this since I started quilting so rather than pins, I find the painter's tape works best.  And yes, I still get on my hands and knees.  This was about a 45 minute process.  It used to go faster when I had my handy-dandy helper, but since he is now 18, helping mom sandwich a quilt is not on the agenda.  :)

This is how is looks at this point:

Now I center the batting, followed by the quilt top and smooth everything out so I am sure it lays well.  I then pull back the top and batting half way and spray the BATTING with spray baste.  Yes, I do spray baste rather than pins.  I find that the quilting is not free moving with constant stops to remove pins and I do not have a problem with the aeresol.  

I do, however, make sure the area is well ventilated.  That is an interesting prospect in the winter when it is cold outside most of the time.  The temperature this morning when I was sandwiching, was   9 degrees.  But the wind was blowing as it almost always does!

Once I spray on half of the batting, I bring it back up and fold back the other side and spray.  It does not take a lot of spray, just a nice continuous movement of the hand.  When spray, I direct toward the quilt, and that keeps adhesive from getting on the carpet.  Then I pull back one half of the quilt top and spray the batting and then the other half, and the sandwich is complete.  I spray the batting because I find it holds better and I really don't want to spray anything on my fabric.  After smoothing, the sandwich is complete.  I like to wait up to 24 hours before quilting.  It just feels like it has had time to adhere better.
Here is the spray basted quilt waiting to be quilted!

I actually couldn't wait and worked on it a bit this afternoon.     Before working on designs within each panel, I stitched in the ditch around the area and also stitched around the appliqué.
I will be adding some texture to the leaves as well with vines inside. 

I will be showing more tomorrow; have a great evening!